


Best Practices for Securing and Optimizing SSH Connections in Unix and Linux Systems


Secure Shell (SSH) is a widely used protocol for remote login, file transfer, and remote command execution in Unix and Linux systems. However, SSH connections can be vulnerable to security threats, including man-in-the-middle attacks, brute-force attacks, and password sniffing. In this article, we will explore the best practices for securing and optimizing SSH connections in Unix and Linux systems. We will cover techniques for mitigating man-in-the-middle attacks, as well as quality-of-life improvements such as SSH agent caching, connection multiplexing, and writing host files. By implementing these techniques, you can help ensure that your SSH connections remain secure and perform optimally.
Introduction
When you connect to a remote SSH server, your SSH client and the server exchange cryptographic keys to establish a secure connection. One of these keys is the server's "host key," which is a unique identifier that the server uses to prove its identity.
A man-in-the-middle (MITM) attack can occur if a hacker intercepts the communication between your SSH client and the server and impersonates the server by presenting a fake host key. This can be done through techniques such as ARP spoofing or DNS spoofing, where the attacker intercepts or modifies network traffic to present a fake host key to your SSH client.

If your SSH client does not verify the host key, it will establish a connection with the attacker instead of the real server. From there, the attacker can intercept any data transmitted between your SSH client and the server, potentially including your login credentials or other sensitive information.
SSH Host Key Verification with SSHFP (SSH FingerPrint)
To prevent this type of attack, SSH clients typically prompt the user to verify the server's host key the first time they connect to a new server. However, many users don't take the time to compare the server's host key fingerprint against a trusted source.
SSH host key verification with SSHFP can help improve security. By storing the server's host key fingerprint in a secure DNS record, your SSH client can automatically verify the fingerprint without requiring user intervention. This makes it more difficult for attackers to bypass the verification process and impersonate the server. Even if a hacker steals the server's host key, they won't be able to impersonate the server without also compromising the DNS record.
DNS Security
It's important to note that the DNS system itself needs to be secure for SSH host key verification with SSHFP to be effective. If the attacker is able to compromise the DNS server or modify the SSHFP resource record, they could potentially bypass this protection. To enhance the security of the DNS system, DNSSEC (DNS Security Extensions) can be used. DNSSEC adds digital signatures to DNS records to ensure their authenticity and integrity, making it much more difficult for attackers to modify or spoof DNS records.
How to Use SSH Host Key Verification with SSHFP
To use SSH host key verification with SSHFP, follow these steps:
Get the SSHFP record data using
sshfptogether withssh-keygento retrieve the public host key from the ssh server.ssh-keygen -r example.com | sshfp -a# example output example.com. IN SSHFP 1 1 9d7d95cde3d4c85f2f7b8792a7b3f7b6f9f04e22Configure your DNS server to support SSHFP resource records if needed and add the values from the output of the previous command to your DNS provider of choice
 # Godaddy example
 example.com. 3600 IN SSHFP 1 1
 9d7d95cde3d4c85f2f7b8792a7b3f7b6f9f04e22
Note that the exact syntax and formatting of the SSHFP record can vary depending on the specific DNS provider and interface being used. However, the general format is typically:
<name> <ttl> IN SSHFP <algorithm> <hash-type> <fingerprint>Configure your SSH client to use SSH host key verification with SSHFP by adding the following line to your ~/.ssh/config file:
VerifyHostKeyDNS yes
By following these steps, you can help ensure that your SSH connections are secure and protected against unauthorized access. SSH host key verification with SSHFP, combined with DNSSEC, provides an additional layer of security to prevent man-in-the-middle attacks and protect your sensitive information.
Avoid Blindly Trusting the Server's Identity
When you connect to a remote SSH server for the first time, your SSH client prompts you to verify the server's identity by checking its host key fingerprint. However, if you blindly trust the server's identity without verifying its host key fingerprint, you could be vulnerable to man-in-the-middle attacks.
To avoid blindly trusting the server's identity, follow these steps:
If you are using SSHFP for host key verification, the SSH client will automatically retrieve the SSHFP record for the server from the DNS server and compare it with the host key presented by the server during the SSH connection. If the fingerprints match, the host key is considered valid and the SSH connection is established.
If you are not using SSHFP, you can verify the server's host key fingerprint by comparing it with the fingerprint provided by the server administrator.
If the fingerprints match, add the server's host key to your
~/.ssh/known_hostsfile by typingyeswhen prompted by your SSH client.If the fingerprints don't match, abort the connection and investigate the issue further.
Additional Tips: Use SSH Agent Caching, Connection Multiplexing and Host Files
Agent Caching
SSH agent caching allows you to enter your passphrase once when you start your SSH agent, and then use your SSH keys without being prompted for your passphrase again. This can help save you the headache of repeatedly decrypting your SSH keys.
To use SSH agent caching, follow these steps:
Start your SSH agent by typing
eval $(ssh-agent)in your terminal.Add your SSH keys to your agent by typing
ssh-addfollowed by the path to your SSH private key file.
SSH Agent Forwarding
Also worth noting, the SSH agent's key forwarding feature allows you to use your SSH keys loaded in the SSH agent on the original server on different remote hosts without having to copy the private key to the jump server (aka bastion host). By enabling key forwarding, you can easily jump from one server to another while maintaining the security of your SSH keys.
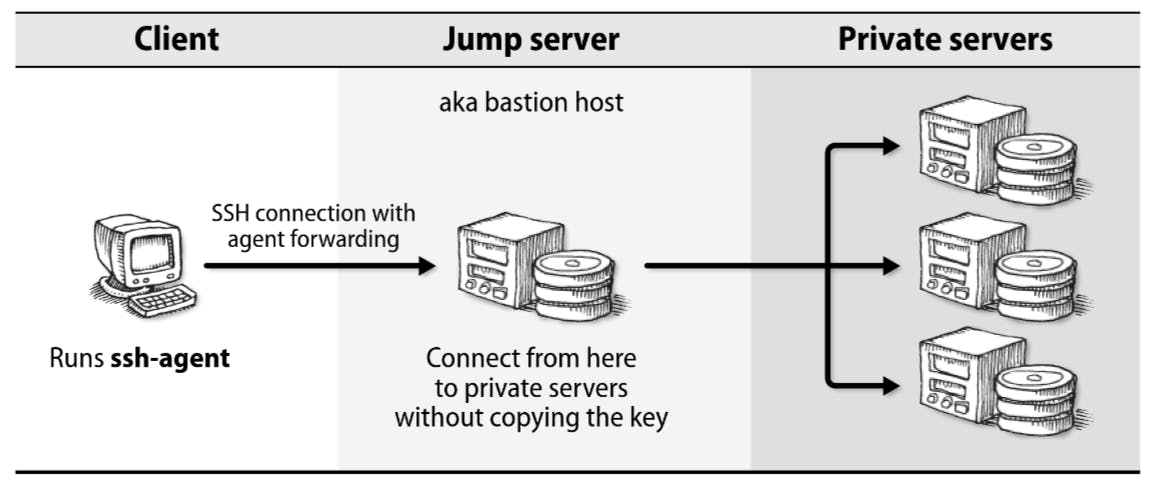
You can enable SSH key forwarding either by using the command line flag -A or adding this to your ~/.ssh/config :
ForwardAgent yes
Connection Multiplexing
Connection multiplexing allows you to reuse an existing SSH connection for subsequent SSH connections to the same server. This can help reduce the time required to establish new SSH connections and improve overall SSH performance.
To use connection multiplexing, follow these steps:
Add the following lines to your
~/.ssh/configfile:Host * ControlMaster auto ControlPath ~/.ssh/control-%C ControlPersist 10mControlMaster autoEnables SSH multiplexing to share a single network connection between multiple SSH sessions.
ControlPath ~/.ssh/control-%CSpecifies the location and naming convention for the Unix domain socket used by SSH multiplexing.
ControlPersist 10mKeeps the control connection alive for 10 minutes after the last SSH session is closed.
Close the SSH connection by typing
exit. Subsequent SSH connections to the same server will reuse the existing connection but require separate authentication.
Writing Host Files
Host files are a simple yet powerful way to manage SSH connections to multiple remote servers. A host file is a plain text file that contains a list of remote servers and their associated SSH settings, such as the server's hostname, IP address, username, and SSH port. By using host files, you can avoid having to remember or type in the SSH connection details for each remote server.
To create a host file, follow these steps:
Create a new file in your home directory called
~/.ssh/hosts.Add a new block for each remote server, using the following format:
 Host server-alias
     Hostname server-hostname-or-ip-address
     User server-username
     Port server-ssh-port
     IdentityFile /path/to/ssh/private/key
Save the file.
To connect to a remote server using a host file, simply type ssh server-alias.
Conclusion
Securing SSH connections in Unix and Linux systems is critical to preventing unauthorized access and protecting sensitive data. By following these best practices, you can improve the security of your SSH connections and reduce the risk of security incidents. Remember to use SSH host key verification with SSHFP, avoid blindly trusting the server's identity and Use SSH agent caching, connection multiplexing, and host files to significantly improve the performance, security, and convenience of your SSH connections.
References
- Nemeth, E., Snyder, G., Hein, T., Whaley, B., & Mackin, D. (2017). The Unix and Linux Administration Handbook, 5th Edition. Addison-Wesley Professional. Chapter 27: "Security".